Search
    Google
    Tip of the Day Blog
    The Web

Entries in Backup (26)

Friday
Jan202012

How to Recover Accidentally Deleted Picture or File

How to Recover that Photo, Picture or File You Deleted Accidentally

image

Have you ever accidentally deleted a photo on your camera, computer, USB drive, or anywhere else? What you might not know is that you can usually restore those pictures—even from your camera’s memory stick.

Windows tries to prevent you from making a big mistake by providing the Recycle Bin, where deleted files hang around for a while—but unfortunately it doesn’t work for external USB drives, USB flash drives, memory sticks, or mapped drives. Luckily there’s another way to recover deleted files.

Note: we originally wrote this article a year ago, but we’ve received this question so many times from readers, friends, and families that we’ve polished it up and are republishing it for everybody. So far, everybody has reported success!

Restore that File or Photo using Recuva

The first piece of software that you’ll want to try is called Recuva, and it’s extremely easy to use—just make sure when you are installing it, that you don’t accidentally install that stupid Yahoo! toolbar that nobody wants.

Now that you’ve installed the software, and avoided an awful toolbar installation, launch the Recuva wizard and let’s start through the process of recovering those pictures you shouldn’t have deleted.

The first step on the wizard page will let you tell Recuva to only search for a specific type of file, which can save a lot of time while searching, and make it easier to find what you are looking for.

Next you’ll need to specify where the file was, which will obviously be up to wherever you deleted it from. Since I deleted mine from my camera’s SD card, that’s where I’m looking for it.

The next page will ask you whether you want to do a Deep Scan. My recommendation is to not select this for the first scan, because usually the quick scan can find it. You can always go back and run a deep scan a second time.

And now, you’ll see all of the pictures deleted from your drive, memory stick, SD card, or wherever you searched. Looks like what happened in Vegas didn’t stay in Vegas after all…

If there are a really large number of results, and you know exactly when the file was created or modified, you can switch to the advanced view, where you can sort by the last modified time. This can help speed up the process quite a bit, so you don’t have to look through quite as many files.

At this point, you can right-click on any filename, and choose to Recover it, and then save the files elsewhere on your drive. Awesome!

Download Recuva from piriform.com

Restore that File or Photo using DiskDigger

Update: it looks like since we first wrote about this, DiskDigger became shareware, which gives you a prompt for every file you save. It’s up to you whether you want to try it—best bet, try Recuva first. You could alternatively use the slightly older, but still totally free, portable version of the application from portablefreeware.com. Thanks, Mary!

If you don’t have any luck with Recuva, you can always try out DiskDigger, another excellent piece of software. I’ve tested both of these applications very thoroughly, and found that neither of them will always find the same files, so it’s best to have both of them in your toolkit.

Note that DiskDigger doesn’t require installation, making it a really great tool to throw on your PC repair Flash drive.

Start off by choosing the drive you want to recover from…

Now you can choose whether to do a deep scan, or a really deep scan. Just like with Recuva, you’ll probably want to select the first one first. I’ve also had much better luck with the regular scan, rather than the “dig deeper” one.

If you do choose the “dig deeper” one, you’ll be able to select exactly which types of files you are looking for, though again, you should use the regular scan first.

Once you’ve come up with the results, you can click on the items on the left-hand side, and see a preview on the right.

You can select one or more files, and choose to restore them. It’s pretty simple!

Good luck recovering your deleted files!

How to Recover that Photo, Picture or File You Deleted Accidentally - How-To Geek

Thursday
Jan122012

Video overview of Dropbox

Friday
Dec162011

iomega SuperHero Backup and Charger for iPhone


Review: iomega SuperHero Backup and Charger for iPhone

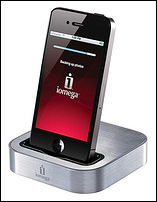
iomega thumbnailMy iPhone and MacBook are constantly connected, and with the advent of wireless sync in iOS 5, even when they're not connected, my phone still stays in sync with my computer data, which would be a life saver if I ever -- horrors! -- lost my iPhone.

But most people who have iPhones don't sync very often at all, and a surprising number of iPhone owners have never sync'd their phone to their computer.

That's the old school vision of your cellphone as a standalone device that works or dies, and there's no way for you to interact with it on your computer or in "the cloud", so I completely understand people who go from a Motorola or a Nokia device to an iPhone and use it the same way.

The problem is, what if their phone gets broken or they lose it? What happens to the photos they took on the device? What happens to their contact list and address book?

Enter the simple, ingenious iomega SuperHero Backup & Charger for iPhone.

The $59.99 device (street price might be lower) primarily works as a convenient charging dock: mine actually lives in my kitchen and is almost always in use, between my iPhone, my iPods, my family's devices and friends phones that need a quick charge.

The magic happens when you also have the iomega SuperHero Backup app [iTunes link] on your iPhone before you drop it on the dock, because then the device automatically grabs a backup copy of your contacts and photos, saving it on a 4GB SD Card (included) that tucks neatly into the back of the device. And not just the iPhone 4 series, iomega specs it to include backup and restore support for the Apple iPhone 4, 3GS, 3G, and iPod touch (4th generation).

The key to getting that functionality work is to unlock your iPhone before you put it on the dock. It's something that makes sense from a security standpoint (no surreptitious backups, sorry Ethan Hunt!) but a tiny part of me wishes it just worked without any extra fuss. Still, not exactly onerous and you don't have to remember every single time you dock the device for a charge and, as you might suspect, it doesn't backup anything if you don't have the free companion app on the phone.

Once you drop the phone on the SuperHero charger device, unlocked, it instantly launches the app and gives you 30 seconds to decide if you want a backup or not:

iomega superhero iphone backup charger 2

You can ignore it or just tap on "Start Now" to get going...

iomega superhero iphone backup charger 3

I have a lot of contacts, and a lot of photos. You can see the progress bar above on the backup. It takes about a minute for the SuperHero to grab everything on the device and ferret a copy away on the SD Card.

When it's done with the backup, the app sticks around in case you want to make any changes or -- most importantly -- restore from a previous backup because you've a new phone or your existing data has gotten corrupt:

iomega superhero iphone backup charger 4

Can you restore from the backup of a different iPhone? I asked the iomega team because that feature by itself would make this a terrific device to acquire for anyone about to jump from a 3gs to an iPhone 4, or a 4 to a 4s, and they said: "Contacts and photos from older model iPhones can be restored to brand new iphones (even 4s) or the same model iPhone without ever going back to the computer."

By default, the backups on the SD Card aren't encrypted, which is something you can, and probably should, change. That'd done with the Settings option:

iomega superhero iphone backup charger 5

With 550+ contacts and about 200 photos, my backup archive on the SD Card turns out to be about 250MB (simple to ascertain: I plugged the card into my computer). That means that the 4GB card included with the device should be able to handle over a dozen phones without breaking into a virtual sweat. If you have a dozen iPhones and iPods, then you're set! More seriously, it's a nice, compact format and that's a good thing.

After years of owning iPhones of various models, I've learned it's always smart to be charging your device whenever the opportunity arises, so I've had a charging dock on my kitchen counter for years. The fact that the new iomega charger also does instant backups of my contacts and photos is a big plus, and makes it well worth the $59.99 suggested retail. For comparison, the Apple charging dock is $29.99 and does nothing other than, well, charge your devices.

iomega superhero backup charger iphone

Iomega Superhero Backup Charger, rear view.
Note SD Card and plug for external power (required)

Truthfully, I really like these sort of gadgets. Smart, simple design and very easy to integrated into your daily workflow and life. A redundant backup of my address book is itself worth the money to me, but the fact that this is also a sleek, attractive charging dock makes it a must-have accessory for anyone who wants the peace of mind of knowing that even if their phone breaks or gets lost or stolen, they have all their precious data saved.

Review: iomega SuperHero Backup and Charger for iPhone :: Online Tech Support Help :: Ask Dave Taylor!®

Wednesday
Oct262011

Backup iPhone Contacts Online Automatically

How To Store iPhone Contacts In Google Gmail Account Online Backed Up Automatically All The Time

Every time when I upgrade my iPhone to the latest firmware I often lost my some of my contacts due to wrong sync or some other error. So I decided to search for a online iphone contacts backup solution then I came to know about iDrive which comes with a free and paid version which simply allows you to backup or store iphone contacts which you can restore with the help of this app.

But for all the new contacts you keep on adding, you will need to run the contacts backup upload manually at times, so that you have the latest backup stored with the recent new contacts you have added.

After searching some I found another free solution which was more easy to implement, and with this way I could store my iPhone contacts on my google Gmail account as contacts, and this way when ever I add a new contact it gets automatically stored on google server without any extra effort.

Follow the guide below on how to save all iphone contacts backed up in gmail

Google Sync on your iPhone, iPad, or iPod Touch allows you to store all iphone contacts in gmail all the time. Google Sync is only supported on Apple iOS versions 3.0 and above. You can check your current version by going to Settings > General > About > Version.

1. Open the Settings application on your device’s home screen.

014

2. Open Mail, Contacts, Calendars.

016
3. Press Add Account….

4. Select Microsoft Exchange. iOS 4.0+ allows multiple Exchange accounts.

017

Enter Account Info

5. In the Email field, enter your full Google Account email address. If you use an @googlemail.com address, you may see an "Unable to verify certificate" warning when you proceed to the next step.
6. Leave the Domain field blank.
7. Enter your full Google Account email address as the Username.
8. Enter your Google Account password as the Password.
9. Tap Next at the top of your screen.
9a. Choose Cancel if the Unable to Verify Certificate dialog appears.
10. When the new Server field appears, enter m.google.com.

018

Once this is done you can see all contacts stored in gmail account.

Read more: http://www.technixupdate.com/how-to-store-iphone-contacts-in-google-gmail-account-online-backed-up-automatically-all-the-time/#ixzz1bQDV77zD

How To Store iPhone Contacts In Google Gmail Account Online Backed Up Automatically All The Time

Friday
Aug052011

How to Back Up Your Gmail the Easy and Cheap Way

How to Back Up Your Gmail the Easy and Cheap Way

How to Back Up Your Gmail the Easy and Cheap WayGmail users put a lot of their lives into their inboxes. Over nearly seven years, with ever-increasing storage, how could you not? So if your inbox suddenly went blank, where would you turn? Now's the time to get a secondary stash in place. Here are four options—free or cheap, easy or geeky—that will give you peace of mind.

Keep in mind that Gmail's data loss from this weekend wasn't actually a total loss for anybody, and that, as a result of a bug caught quickly, only about 40,000 users, or 0.02 percent of Gmail's estimated 200 million, were effected. And everybody got their email back, eventually, as Gmail goes so far as to keep tape backups of everything. But for a weekend, some users had no access to anything they'd ever sent or received. And when more typical site outages occur, one can act the part of a pro if they've got a backup source for anything they need from their life's files.

Below, we've separated a few of your backup options into levels of convenience, price, and geekiness. We recommend finding the option that hits your sweet spot and making sure you've got your email backed up.

For Those Who Don't Mind Paying for Convenience: Backupify

Full size

Once you sign up for Backupify, then authenticate your Gmail or Google Apps account through the service, you really don't have to do anything—and we mean that. Backupify uses its servers to pull data from Google's servers, and after an average of 2-3 days, your Gmail archives are there, and new stuff slowly streams over.

Backupify also backs up Facebook data, Flickr photos, Google Docs, your long-term Twitter stream, and lots of other webapps. Best of all, they're offering one year for free right now with discount code savegmail, so giving Backupify a try is really worth the (very minimal) effort.

For Cheapskates Who Like Automation: Gmail-to-Hotmail

What are the moral implications of using Hotmail primarily as a free, server-to-server backup of your Gmail messages? We cannot say. But Hotmail really, really wants you to transfer over your messages, and they've even created a simple web interface for doing so: TrueSwitch.

How to Back Up Your Gmail the Easy and Cheap WayFirst up, though, sign up and secure a Hotmail account, get a good password, and sign into it. Then head to TrueSwitch, enter your Gmail user/pass info, then your new Hotmail login, and choose what you want Hotmail/Windows Live to copy over. As with all the other options, you'll likely have to wait a while, but once all your data has arrived, you'll get an email from Hotmail, letting you know you're all set.

Hotmail is a nice backup solution in a few ways, really. First off, you can send messages from your Gmail address using the account importing tool, and Hotmail offers a nice spam-fighting alias feature.

For Free, Local, DIY Backup: Desktop Thunderbird (and Then Somewhere Else)

Gmail offers access to all your mail through desktop clients, even the really old stuff. You could use Outlook or Apple Mail to download all of it, but Thunderbird is free, works on any system, and creates nicely portable packages that are handy for any other backups you're doing (you responsible data owner, you).

Full size

First things first: head to Gmail, click the "gear" in the upper-right corner, choose Mail settings, then head to Forwarding and POP/IMAP. Enable POP for all mail, and set Gmail to keep its copy. At this point, you should download and install Thunderbird, if you haven't already.

You can then click Gmail's link for configuration instructions; their step-by-step walk-through for Thunderbird 3.0 is spot on. Alternately, Thunderbird's automatic configuration usually picks up on the necessary Gmail settings if you enter your Gmail username and password. But if you're only planning to use Thunderbird for this backup job, you only need to have the incoming settings up and running for POP mail, so hit the "Manual Setup" button and drop this in:

Incoming: change to "pop.gmail.com"
Protocol (the drop-down list to the right of the Incoming field): change to "POP"
Port (the field to the right of the protocol drop-down list): change to "995"

Clear out the Outgoing settings if you'd like, but they won't do much harm. After hitting OK and verifying that everything's working, your only job is to keep Thunderbird running on your system whenever you can, and to give it a few days to grab everything.

Your Gmail messages are stored inside your Thunderbird profile, which you can find in a semi-discrete location. We'd highly recommend backing up that profile in the same way you'd back up your other important data, and hopefully somewhere online. Now you've got triple-threat access to all of your mail history, and Gmail's rare service interruptions and hiccups affect you hardly at all.

How to Back Up Your Gmail the Easy and Cheap Way