Drawing a Box around Text in Microsoft Word
Microsoft Word offers a truly dazzling (and sometimes bewildering) array of options for dressing up your documents. One of the most popular is the Borders and Shading feature. It's versatile, useful, and, best of all, easy to use. If all you want to do is draw a simple box around some text, just follow these steps:
1. Select the text you want to draw a border around.
You can select individual characters, a single word or group of words, or a single paragraph or even a group of paragraphs.
If you don't select text at all, Word draws a border around the entire paragraph the cursor happens to be sitting in. As a result, if you want to draw a box around an entire paragraph, just click the mouse anywhere in the paragraph and proceed to the next step.
2. Choose Format‡Borders and Shading.
The Borders and Shading dialog box appears, as shown in Figure 1.
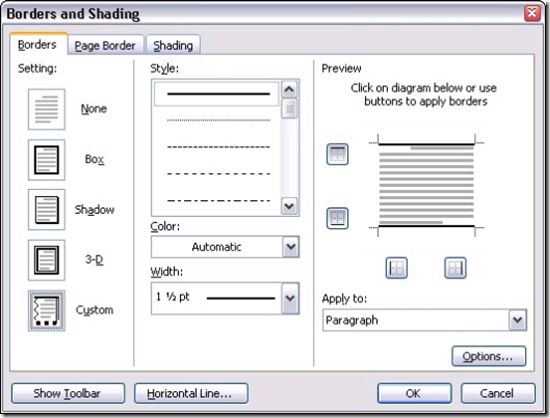
3. Click Box in the list of border types that appears at the left of the Borders and Shading dialog box.
The Borders and Shading dialog box has plenty of options that let you create fancier borders. For now, just click Box.
4. Click OK.
The Borders and Shading dialog box vanishes, and your text now has a box around it.
The following paragraphs describe some of the additional tricks you can perform with the Borders and Shading dialog box:
- In addition to the Box border style, the Borders and Shading dialog box offers two other preset border styles: Shadow and 3-D. You can experiment with these settings to see what effect they have.
- You can also build a custom border one line at a time by clicking the buttons around the various edges of the paragraphs represented in the Preview area to indicate which edges you want a border to appear. These buttons control whether a border appears above, below, to the left, or to the right of the selection. If you select more than one paragraph, you also see a button that lets you add or remove lines between the paragraphs.
- The Style drop-down list lets you choose a fancy style for each line of the border. Various styles, such as double lines and dashed lines, are available. Note that you can change line styles as you apply individual borders, so that a paragraph can have a thin border at the top and a thick border at the bottom.
- The Color drop-down list lets you set the color for your border. You can select a standard color that appears in the list, or you can click More Line Colors at the bottom of the list of colors to bring up a dialog box that lets you choose any color you want.
- The Width drop-down lets you choose a width for each segment of the border.
By default, the borders are placed one point from the text they surround. If that placement is too right for you, you can adjust it by clicking the Options button in the Borders and Shading dialog box. The Borders and Shading Options dialog box comes up.


 Miguel M. de la O