Fixing common photography problems with Picasa
Fixing common photography problems
Posted by Chris Mysen, Software Engineer
One of the best things about digital photography is that it's cheap and easy to learn from your mistakes. With a high-capacity memory card, you can shoot photos for days on end, and big LCD screens make it easy to review snapshots as you go. But all the photography practice in the world doesn't guarantee you a great picture every time. After many years of photography under my belt, I still tend to misfire on a few shots, and sadly, don't always get the opportunity to try again. Capturing the right scene remains one of the most important things you can do as a photographer. If you manage that, a tool like Picasa can help recover 'problem photos.' Here I'll show you a few techniques for fixing some of the most regular problems digital photographers encounter.Problem #1 -- Too dark
If you shoot a lot of photographs, you've probably seen this. The electronics inside digital cameras work hard to find the right average tone for a photo. Sometimes, though, they miss the mark.Here's a typical example of a dark picture that wasn't caused by a lack of lighting, but rather by having too much white and light colors in a photograph -- something that can throw digital cameras for a loop. The background wall in this photo was a bright whiteboard with colorful sticky notes. The camera's processor returned colors that look washed out and a background that's a dull shade of gray. Without going into too much technical detail, finding a dull and resolutely 'average' shade of gray for the picture is exactly what the camera processor is aiming to do... but that's not what we really want, in a case like this.
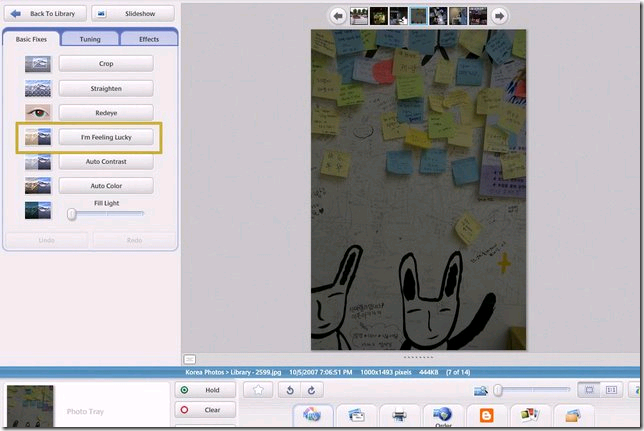
I found that clicking the 'I'm Feeling Lucky' button, which automatically adjusts a number of settings, corrected the problem nicely. 'I'm feeling lucky' won't always work, but it's generally a good place to start. You'll notice how effective the procedure was in the photo below:

Problem Photo #2 -- Dark And Not Straight
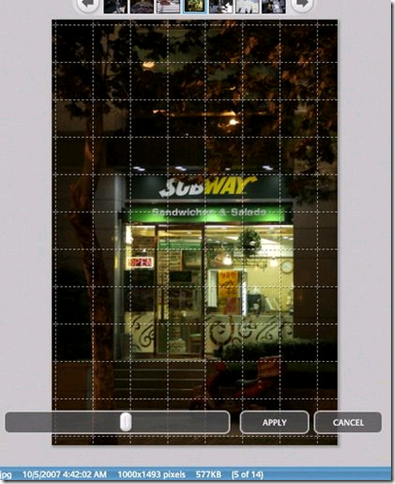
The next photo we're going to cover actually has two big problems. And too bad for me, 'I'm Feeling Lucky' isn't quite lucky enough this time. For starters, this photo is too dark. It would be nice if we could pull out more details of the tree and the scooter from the dark parts of the photograph. And not to mention, the photo isn't quite straight. That's not uncommon -- it's hard to spend the time to make sure every photo is perfectly horizontal, and a lot of scenic photographs wind up marred by sloping horizons.

The 'Straighten' and 'Fill Light' buttons are just what we need in this case. When you click on the 'Straighten' button, a series of grid lines appear on the screen, which you can use to help you know when straight lines in the photograph are properly horizontal. Drag the slider at the bottom until everything lines up, then click 'Apply.' Looks like we just fixed our leaning tower of Subway!
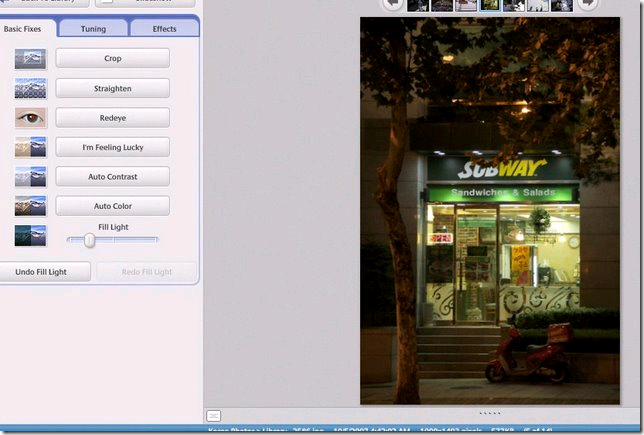
Next, we need to brighten up the photo a little bit. You can do this with the 'Fill Light' slider on the left side of the screen. Drag it to the right until you feel that the photo is bright enough.
Problem #3 -- a flat-looking photo
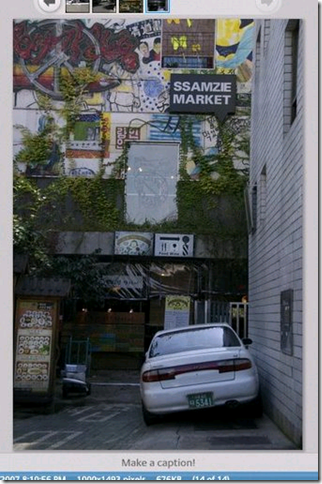
Flat-looking photos come up for a number of reasons. Often, you'll find that areas with weak lighting cause a photograph to lose color and contrast. If you're shooting in the shade, you may even find that your photographs take on a bluish tone. Here's an example photo that came from an alley without a lot of sunlight.
Fixing this photo requires clicking on the 'Tuning' tab, which is where Picasa's power tools live. Here you can selectively darken shadows and lighten the highlights, both of which we'll need to tweak in order to save this photograph. Additionally, the color is a little bit gray and should be made 'warmer' (meaning a bit more yellow). To fix all these issues, we'll use the 'Highlights,' 'Shadows,' and 'Color Temperature' sliders. Look at the position of the sliders below -- I brought the highlights up a little bit, and darkened the shadows significantly. This brings out the contrast between the light/colorful wall and the dark restaurant below. It also does a nice job of making the white car look white. Bringing up the "Color Temperature" added a nice bit of punch, as well. You can see that the green plants are more vivid and the wall colors look more lively.
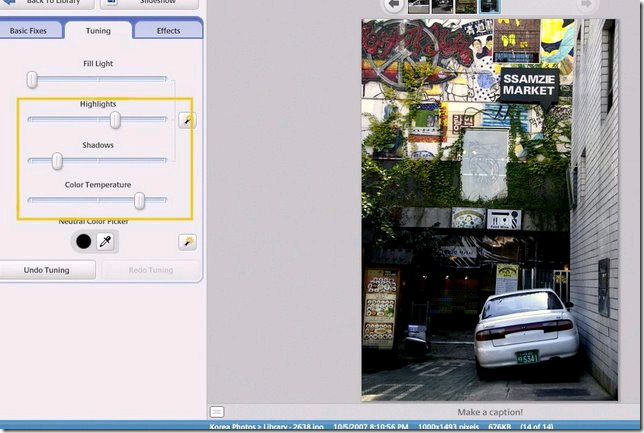
It may not be as simple as pressing the 'I'm feeling lucky' button, but the five tools in the 'Tuning' tab can work wonders. All you really need is a careful eye, and a willingness to experiment, and you'll be surprised at what you can do.


 Miguel M. de la O