Search
    Google
    Tip of the Day Blog
    The Web

Entries in Printing (12)

Monday
Apr092012

Printing large spreadsheets in Excel

Printing those monster Excel sheets

by The Guru

Post image for Printing those monster Excel sheets


Taming the Large Spreadsheet: The Process

Once you’ve acquired some basic skills in Excel, the process for formatting a sheet to print is really pretty straightforward:

  1. Setting the Print Area and Print Titles
  2. Inserting Headers and Footers
  3. Controlling Margins, Page Orientation, and Page Size
  4. Inserting/Adjusting Page Breaks
  5. Previewing the final result and tweaking where necessary

Let’s step through it.

Setting the Print Area and Print Titles

Right off the bat, you’re going to need to decide how much of the spreadsheet to print.

Most of the time, you need to print the entire thing.  But that doesn’t let you off the hook here.

That’s because, even if you want to print all the data (the Print Area), you’re probably going to want to print the row and column labels on each page (the Print Titles).

Let’s compare two printouts:

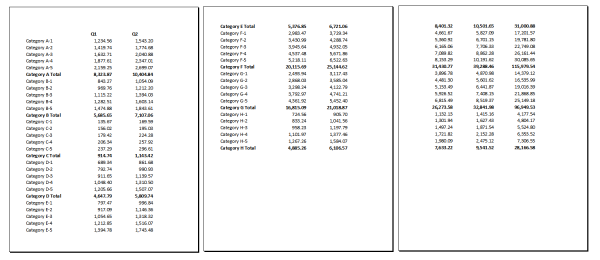
Printout 1

Print Preview Images from Microsoft Excel

Pages 1, 2 and 4 of an Excel printout (click to enlarge)

If you look closely at these Print Preview images, page 1 is fine – you can see the column labels (with the fiscal quarter designations at the top) and the row labels (with the category names) on the left.  But then page 2 is missing the column labels, and if you look at page 4, none of that is carried over that far into the printout.  So, unless you’re planning on taping together your spreadsheet into one big piece of paper, you’re going to have a hard time figuring out which numbers go with each quarter/category.

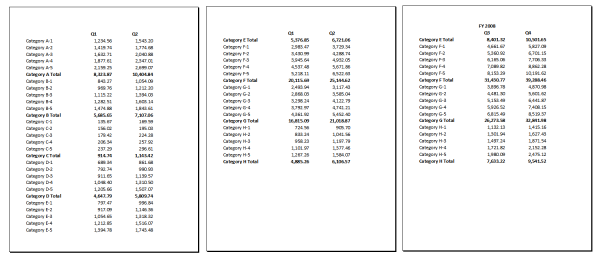
Compare that with Printout 2:

Print Preview from Microsoft Excel

Pages 1, 2, & 4 from printout with changes

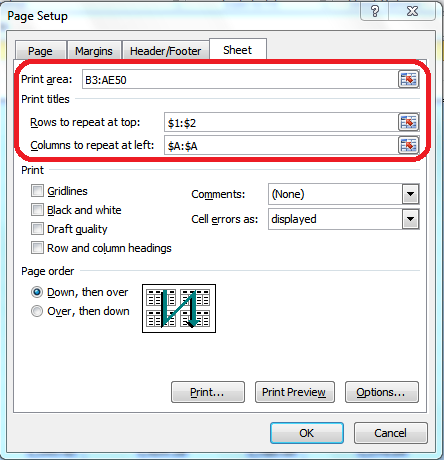
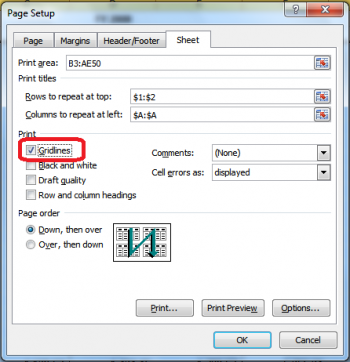
The difference here is that I’ve defined the print area as all of the numbers (from cell B3 to AE50) and the print titles as rows 1 and 2 and column A by going into the Page Setup dialog box from the Page Layout tab, then selecting the Sheet tab:

That’s what enables the row and column labels to print on every page.

Inserting Headers & Footers

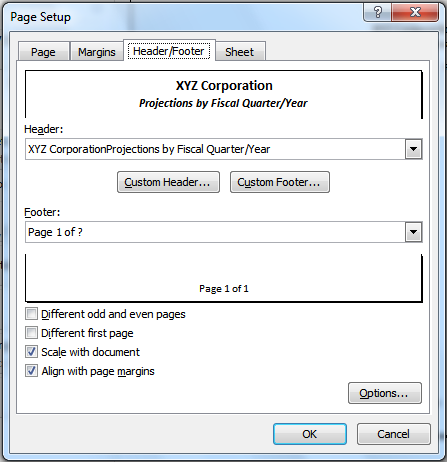
Once you’re in the Page Setup dialog box, you can define headers and footers to print on every page on the Header/Footer tab.  For example, you can insert a custom title at the top and page numbers at the bottom by clicking the Custom Header and Custom Footer buttons:

Excel Page Setup dialog box - Header Footer tab

Controlling Margins, Page Orientation and Page Size

The printout is starting to look somewhat better, but there’s some further tweaking to be done here.  For instance, maybe the sheet makes more sense (and prints more attractively) printed landscape rather than portrait.  Or perhaps it’s a good idea to print this on Legal size paper (8.5″ x 14″) or even on Ledger size (11″ x 14″) rather than Letter (8.5″ x 11″).

Given we’re already in the Page Setup dialog box, we’ll just need to explore the other two tabs: Page and Margins.
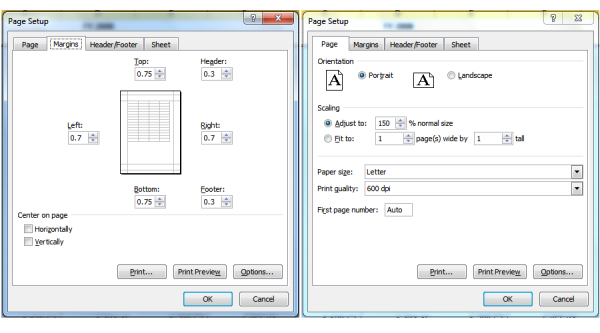
Page Setup dialog box - Page and Margin tabsAs you can see from above, you can adjust the placement of the headers and footers and the page margins on the Margins tab, and control the orientation (portrait versus landscape) and the page size (letter, legal, ledger, A4, etc.) on the Page tab.  You can even scale the spreadsheet up or down by a set percentage, or force the spreadsheet to print on a particular configuration of pages across/down (if you want everything to fit on one page, you’d choose 1 page(s) wide by 1 page(s) tall, for example).

One more thing: if printing gridlines on your sheet would help improve readability (you know, borders around each cell to make following rows/columns easier), go back to the Sheet tab and check the Gridlines box:

Page Setup dialog box, Sheet tab - Gridlines

Notice here, too, that you can also control whether the row and column headings (1, 2, 3 for rows, A, B, C for columns) print on your sheet.  Excel will also let you set whether the printout order goes horizontal then vertical or the other way around (in other words, whether you want the pages to print across, then down).

At any point, you can click Print Preview to check your progress.

Inserting/Adjusting Page Breaks

With some sheets, you may want to be sure that certain information appears together on a page.  In the sample sheet, it would probably make the information more readable to print all of a fiscal year’s information one sheet across.

You’re probably familiar with page breaks in Word.  Excel’s are different in one key respect: you can define page breaks horizontally and vertically.

The easiest way to deal with page breaks in Microsoft Excel is in Page Break Preview mode.  Go to the View tab on your ribbon and click Page Break Preview:

Workbook Views

Excel will automatically place some page breaks for you.  In Page Break Preview mode, you can literally drag those pre-defined page breaks around on the screen until they’re placed where you want them.

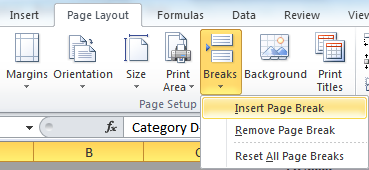
If you need to manually insert a page break within your Excel sheet, select the row or column directly after which you want to insert the break, then go to the Page Layout tab and, in the Page Setup section, click the drop-down under Breaks to insert the appropriate break:

Excel Insert Page Break

If you make a mistake in where you insert your page break, simply drag the page break to the right spot (since you’re in Page Break Preview mode anyway).

Previewing and Adjusting the Final Print Result

At virtually any point in this process, you can go to Print Preview to check your progress and make a note of any adjustments you need to make.

If you’ve upgraded to version 2010 yet, you can also make adjustments directly in Print Preview:
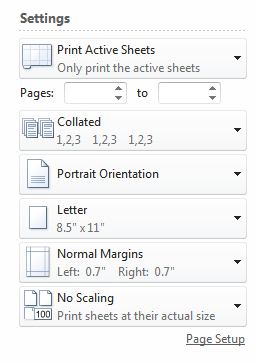
Microsoft Excel print preview settingsThe above menu appears directly to the left of the preview of your document.  You can make on-the-fly adjustments within this menu, or click Page Setup at the bottom to go back to the Page Setup dialog for more options.

The Final Result

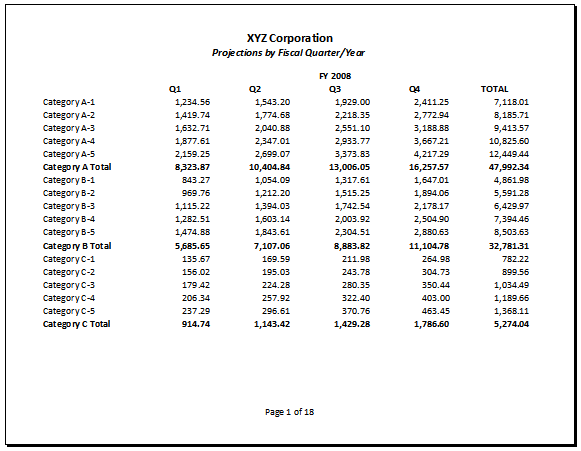
After all that, here’s how the sample spreadsheet finally prints:


The Video

Because these things sometimes are more easily explained by showing you step-by-step, I’ve added a video below, along with a downloadable transcript.

Here’s a link to the video: Excel-print-large-spreadsheets.mp4

And here’s the video transcript: Excel-Monster-Spreadsheet-Video-Transcript.pdf

Printing large spreadsheets in Microsoft Excel 2007-2010

Wednesday
Feb222012

Self-publish books for Kindle and other platforms using BookType

How to self-publish books for Kindle and other platforms using BookType

by Sarah Watts


BookType is being touted as the WordPress of books and e-books as it lets you self publish your books for Kindle, other digital formats, and for that matter, even for print publications like Lulu.com (it lets you print books on demand).

Ever since the launch of digital book formats such as Kindle there have been many self published books and some writers have actually experienced massive success in the arena of self publishing.

Self publishing, as mentioned in this Read Write Web blog post, is a trend that is fast catching up. No longer you have to work with big publishing houses and elusive agents in order to get your book published. Although there are many online collaboration tools (even GoogleDocs) with BookType you can collaborate with other authors specifically for creating books.

BookType is a social platform with Twitter-like capabilities that allow you to exchange ideas and have real time conversations with different collaborators. It is ideal for non-fiction, research-based, data intensive books rather than fictions and stories, although it isn’t necessary that you cannot dabble with fiction using BookType. Along with tracking changes it also allows you to import content, grab data snippets, images and other bits of information and put them in your book.

It is quite easy to create a new book in BookType or work on an existing book. It uses a GUI interface to make working on your book as easy as possible, although right now the interface doesn’t look as fancy as you might find in many desktop as well as web-based applications such as word processors. The moment you have logged in you are given an option of either creating a new book or opening an existing book for editing.

Writing e-books in BookType

As you can see in the above image there are different tabs you can use to manage various aspects of the book you are creating. Eventually when the book is created, you can publish it using your preferred format, whether you want to promote it on Kindle or somewhere else.

Publishing your book in BookType

Every version of the book is saved in the history section so you can jump to any version you feel like and start working from the.

BookType is available in most of the platforms using computers, smart phones and tablet computers. It uses a web interface so if you want to download the open source software you will need to run it on a server.

Self publishing is an emerging market and there is going to be a horde of open source as well as expensive commercial tools to enable writers all over the world publish for themselves rather than for agents and publishers.

Read the review of BookType on the Forbes website.

Here is an introductory video on BookType

How to self-publish books for Kindle and other platforms using BookType

Friday
Jul152011

Printer specs that matter

Printer specs that matter

by Melissa Riofrio, PCWorld  

When you're buying a printer, it makes sense to think long-term. Pay attention to issues like the page yield of the cartridges your printer uses and whether it can automatically print on both sides of a sheet of paper. Doing your homework about those specs will ensure that the printer you think is cheap won't cost you an arm and a leg over time.

Printers: Specs that don't matter

Engine speed: The engine-speed numbers that most vendors quote are supposed to be indicators of how fast a big print job will take, but printer makers usually calculate them using methods that do not reflect real-world usage. For instance, the printer may be in its faster "draft" mode for speed tests, even though most people print in default mode. Or vendors might omit the first-page-out time (how long the first page takes to exit the printer) from their engine-speed calculations, because it includes an image-processing delay. Unfortunately, that delay is an unavoidable part of any print job that a regular person does.

An example of a more realistic engine-speed indication is the ISO/IEC 24734 Laser Quality Print Speed standard, which prints in default mode and includes first-page-out time.

Printers: Specs that sometimes matter

Monthly duty cycle: This number is an indication of how durable a printer is, so it's an important metric for businesses or other heavy-duty use cases. Some lower-volume printers, such as the one you probably use at home, will not even have a duty-cycle number.

If a printer has a monthly duty cycle of, say, 20,000 pages, it's built to take a fair amount of punishment. However, just as you wouldn't want to run your car at full bore all the time, you wouldn't want to run that much paper through the printer constantly. The actual volume of printing that you should realistically expect to do should be a small fraction—maybe 10 to 25 percent—of a printer's duty-cycle number.

Print resolution: A printer's true resolution has become less important as vendors have manipulated dot size, shape, and placement to improve image quality without increasing the actual dots per inch beyond the most-common 600 by 600 dpi. Resolution specs with a qualifier such as "optimized," "interpolated," or "up to" are manipulated resolutions. If you come upon a printer with true 1200-by-1200-dpi resolution—such a thing is still something of a rarity—you will notice that it is capable of remarkably smooth, sharp text and images.

Scan resolution: Similar to print resolution, scan resolution can be interpolated. Look for the "optical resolution" as the true measure, and also note that for most scanning purposes, 300 dpi is a sufficient resolution. Going higher will result in a really slow scan time, a much bigger image-file size, and a resulting image that isn't necessarily any sharper. Resolution specs with a qualifier such as "optimized," "interpolated," or "up to" are manipulated resolutions.

Printers: Specs that always matter

Automatic duplexing: A printer that can duplex (print on both sides of the page) automatically saves paper. That's good news for both trees and your budget. Manual duplexing—usually with on-screen prompts to walk you through turning over the paper—is better than nothing, but it's probably too much of a hassle for most people.

Page yield: All ink and toner cartridges have a page-yield spec that indicates how many pages the cartridge can print before it runs dry. This spec used to be all over the map, but ISO/IEC industry standards have helped make most cartridges' page yields directly comparable. That said, your mileage will vary depending on what you print and how much you print.

Starter-size cartridges: Some low-end laser and LED printers ship with "starter-size" toner cartridges that have a lower page yield than the usual sizes (and are not for sale otherwise). The starter-size cartridge will run out faster than a standard-size cartridge will, forcing you to buy a replacement sooner

Printer specs that matter | Topics | Working Mac | Macworld

Wednesday
Mar032010

Google Map Buddy

Google Map Buddy

Googlemapbuddy

Google Map Buddy is an excellent free program which you can use to grab any part of a Google map you may need. It’s much cooler than simply doing a rough screen capture, because you can select exactly what you need, roads, satellite or hybrid maps even, select the zoom level, and generally customise the results to your total requirements.


Googlemapbuddy2  Googlemapbuddy3

http://www.redferret.net/?p=18504

Monday
May112009

PDFCreator - Create PDFs from any application that can print. - Ask Leo!