Search
    Google
    Tip of the Day Blog
    The Web
Monday
Apr092012

Printing large spreadsheets in Excel

Printing those monster Excel sheets

by The Guru

Post image for Printing those monster Excel sheets


Taming the Large Spreadsheet: The Process

Once you’ve acquired some basic skills in Excel, the process for formatting a sheet to print is really pretty straightforward:

  1. Setting the Print Area and Print Titles
  2. Inserting Headers and Footers
  3. Controlling Margins, Page Orientation, and Page Size
  4. Inserting/Adjusting Page Breaks
  5. Previewing the final result and tweaking where necessary

Let’s step through it.

Setting the Print Area and Print Titles

Right off the bat, you’re going to need to decide how much of the spreadsheet to print.

Most of the time, you need to print the entire thing.  But that doesn’t let you off the hook here.

That’s because, even if you want to print all the data (the Print Area), you’re probably going to want to print the row and column labels on each page (the Print Titles).

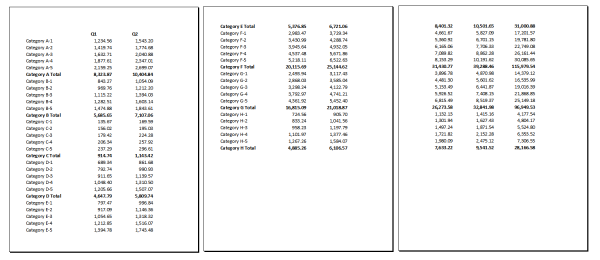
Let’s compare two printouts:

Printout 1

Print Preview Images from Microsoft Excel

Pages 1, 2 and 4 of an Excel printout (click to enlarge)

If you look closely at these Print Preview images, page 1 is fine – you can see the column labels (with the fiscal quarter designations at the top) and the row labels (with the category names) on the left.  But then page 2 is missing the column labels, and if you look at page 4, none of that is carried over that far into the printout.  So, unless you’re planning on taping together your spreadsheet into one big piece of paper, you’re going to have a hard time figuring out which numbers go with each quarter/category.

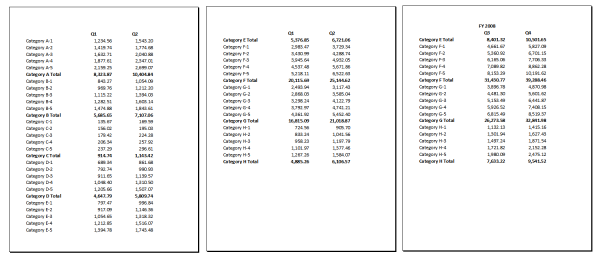
Compare that with Printout 2:

Print Preview from Microsoft Excel

Pages 1, 2, & 4 from printout with changes

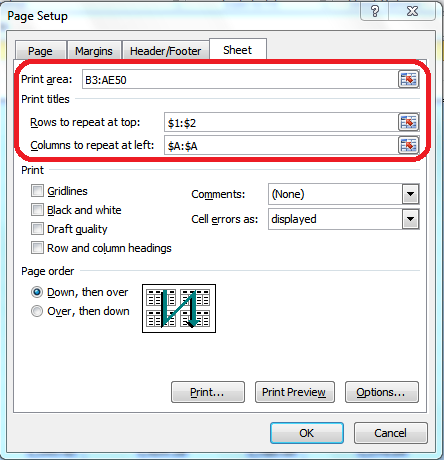
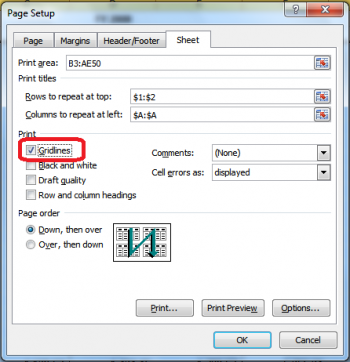
The difference here is that I’ve defined the print area as all of the numbers (from cell B3 to AE50) and the print titles as rows 1 and 2 and column A by going into the Page Setup dialog box from the Page Layout tab, then selecting the Sheet tab:

That’s what enables the row and column labels to print on every page.

Inserting Headers & Footers

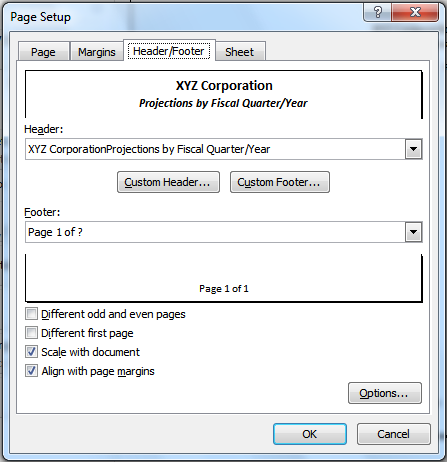
Once you’re in the Page Setup dialog box, you can define headers and footers to print on every page on the Header/Footer tab.  For example, you can insert a custom title at the top and page numbers at the bottom by clicking the Custom Header and Custom Footer buttons:

Excel Page Setup dialog box - Header Footer tab

Controlling Margins, Page Orientation and Page Size

The printout is starting to look somewhat better, but there’s some further tweaking to be done here.  For instance, maybe the sheet makes more sense (and prints more attractively) printed landscape rather than portrait.  Or perhaps it’s a good idea to print this on Legal size paper (8.5″ x 14″) or even on Ledger size (11″ x 14″) rather than Letter (8.5″ x 11″).

Given we’re already in the Page Setup dialog box, we’ll just need to explore the other two tabs: Page and Margins.
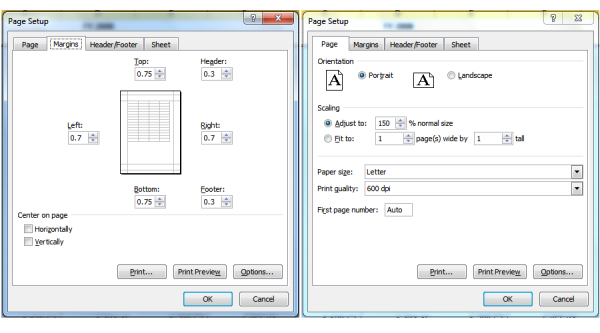
Page Setup dialog box - Page and Margin tabsAs you can see from above, you can adjust the placement of the headers and footers and the page margins on the Margins tab, and control the orientation (portrait versus landscape) and the page size (letter, legal, ledger, A4, etc.) on the Page tab.  You can even scale the spreadsheet up or down by a set percentage, or force the spreadsheet to print on a particular configuration of pages across/down (if you want everything to fit on one page, you’d choose 1 page(s) wide by 1 page(s) tall, for example).

One more thing: if printing gridlines on your sheet would help improve readability (you know, borders around each cell to make following rows/columns easier), go back to the Sheet tab and check the Gridlines box:

Page Setup dialog box, Sheet tab - Gridlines

Notice here, too, that you can also control whether the row and column headings (1, 2, 3 for rows, A, B, C for columns) print on your sheet.  Excel will also let you set whether the printout order goes horizontal then vertical or the other way around (in other words, whether you want the pages to print across, then down).

At any point, you can click Print Preview to check your progress.

Inserting/Adjusting Page Breaks

With some sheets, you may want to be sure that certain information appears together on a page.  In the sample sheet, it would probably make the information more readable to print all of a fiscal year’s information one sheet across.

You’re probably familiar with page breaks in Word.  Excel’s are different in one key respect: you can define page breaks horizontally and vertically.

The easiest way to deal with page breaks in Microsoft Excel is in Page Break Preview mode.  Go to the View tab on your ribbon and click Page Break Preview:

Workbook Views

Excel will automatically place some page breaks for you.  In Page Break Preview mode, you can literally drag those pre-defined page breaks around on the screen until they’re placed where you want them.

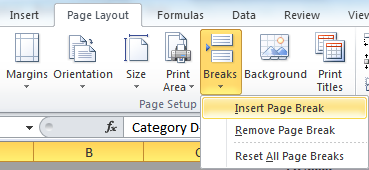
If you need to manually insert a page break within your Excel sheet, select the row or column directly after which you want to insert the break, then go to the Page Layout tab and, in the Page Setup section, click the drop-down under Breaks to insert the appropriate break:

Excel Insert Page Break

If you make a mistake in where you insert your page break, simply drag the page break to the right spot (since you’re in Page Break Preview mode anyway).

Previewing and Adjusting the Final Print Result

At virtually any point in this process, you can go to Print Preview to check your progress and make a note of any adjustments you need to make.

If you’ve upgraded to version 2010 yet, you can also make adjustments directly in Print Preview:
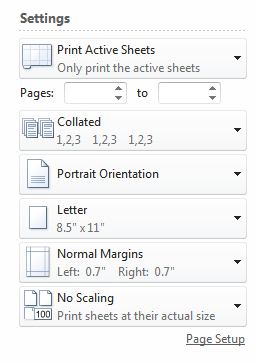
Microsoft Excel print preview settingsThe above menu appears directly to the left of the preview of your document.  You can make on-the-fly adjustments within this menu, or click Page Setup at the bottom to go back to the Page Setup dialog for more options.

The Final Result

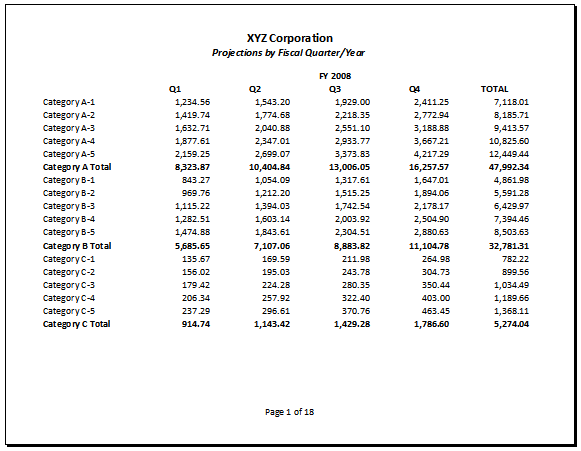
After all that, here’s how the sample spreadsheet finally prints:


The Video

Because these things sometimes are more easily explained by showing you step-by-step, I’ve added a video below, along with a downloadable transcript.

Here’s a link to the video: Excel-print-large-spreadsheets.mp4

And here’s the video transcript: Excel-Monster-Spreadsheet-Video-Transcript.pdf

Printing large spreadsheets in Microsoft Excel 2007-2010

Friday
Apr062012

Set Word AutoRecovery to a Dropbox Location

Set AutoRecovery to a Dropbox Location for Double-Strength Backups

imageThe AutoRecovery (or auto-save) feature in Microsoft Office is great for recovering documents when the program crashes, but if you want to be absolutely certain that backup has a home, change the default location of those save files to your Dropbox (or other cloud storage) folder.

The only time you really need AutoRecovery is when something goes bad. Microsoft Office has a really simple procedure for changing the location in all its programs and all you need to do is change that location to your file syncing service of choice. This is just as applicable to any program you use that automatically saves data. If you're working on a project that's incredibly important, this is a good way to add an extra layer of protection.

Set AutoRecovery to a Dropbox Location for Double-Strength Backups

Thursday
Apr052012

Difference Between Sleep and Hibernate in Windows

What’s the Difference Between Sleep and Hibernate in Windows?

Windows 7 provides several options for conserving power when you are not using your PC. These options include Sleep, Hibernate, and Hybrid Sleep and are very useful if you are using a laptop. Here’s the difference between them.

Note: this article is meant primarily for beginners. Obviously ubergeeky readers will already know the difference between power modes.

Sleep Mode

Sleep mode is a power-saving state that is similar to pausing a DVD movie. All actions on the computer are stopped and any open documents and applications are put in memory. You can quickly resume normal, full-power operation within a few seconds. Sleep mode is basically the same thing as “Standby” mode.

The Sleep mode is useful if you want to stop working for a short period of time. The computer doesn’t use much power in Sleep mode.

Hibernate

The Hibernate mode saves your open documents and running applications to your hard disk and shuts down the computer, which means once your computer is in Hibernate mode, it uses zero power. Once the computer is powered back on, it will resume everything where you left off.

Use this mode if you won’t be using the laptop for an extended period of time, and you don’t want to close your documents.

Hybrid Sleep

The Hybrid Sleep mode is a combination of the Sleep and Hibernate modes meant for desktop computers. It puts any open documents and applications both in memory and on your hard disk, and then puts your computer into a low-power state, allowing you to quickly wake the computer and resume your work. The Hybrid Sleep mode is enabled by default in Windows on desktop computers and disabled on laptops. When enabled, it automatically puts your computer into Hybrid Sleep mode when you put it into Sleep mode.

Hybrid Sleep mode is useful for desktop computers in case of a power outage. When power resumes, Windows can restore your work from the hard disk, if the memory is not accessible.

Where are the options?

The Sleep and Hibernate options are accessed using the arrow button next to the Shut down button on the Start menu.

If you don’t see the Sleep option or the Hibernate option, it may be for one of the following reasons:

  • Your video card may not support the Sleep mode. Refer to the documentation for your video card. You can also update the driver.
  • If you don’t have administrative access on the computer, you may have to refer to the administrator to change the option.
  • The power-saving modes in Windows are turned on and off in your computer’s BIOS (basic input/output system). To turn on these modes, restart your computer and then enter the BIOS setup program. The key for accessing BIOS differs for each computer manufacturer. Instructions for accessing BIOS generally displays on the screen as the computer boots. For more information, see your computer’s documentation or check the website for your computer’s manufacturer.
  • If you don’t see the Hibernate option, the Hybrid Sleep option is mostly likely enabled. We will explain how to enable and disable the Hybrid Sleep mode later in this article.
How Do I Wake Up the Computer?

Most computers can be woken up by pressing the power button. However, every computer is different. You might need to press a key on the keyboard, click a mouse button, or lift the laptop’s lid. Refer to your computer’s documentation or the manufacturer’s website for information about waking it from a power-saving state.

How to Enable and Disable the Hybrid Sleep Option

To enable or disable the Hybrid Sleep Option, click Control Panel on the Start menu.

Click Power Options in the Control Panel window.

NOTE: If Power Options is not available, select Large icons or Small icons from the View by drop-down list in the upper, right corner of the Control Panel window. In the Category view, you can also click System and Security and then click the Power Options heading.

On the Select a power plan screen, click the Change plan settings link next to the currently selected power plan.

NOTE: You can change the Hybrid Sleep option for either one or both of the power plans. The steps are the same for both.

On the Change settings for the plan screen, click the Change advanced power settings link.

On the Power Options dialog box, click the Change settings that are currently unavailable link.

Click the plus sign next to Sleep to expand the options, if they are not already expanded. Click the plus sign next to Allow hybrid sleep. Select Off from one or both of the drop-down lists under the Allow hybrid sleep heading.

NOTE: You can also double-click on a heading to expand it.

By default, Windows requires a password to access the computer when you wake it up from a power-saving state. You can use the Power Options dialog box to turn this off. The first heading in the list box is the name of the power plan chosen in the drop-down list above the list box. Click the plus sign to expand the heading and select Off from one or both of the drop-down lists under the heading.

Click OK to save your changes and then click the X button in the upper, right corner of the Control Panel window to close it.

How to Prevent Your Computer from Automatically Sleeping or Hibernating

You can prevent Windows from asking for a password when it wakes up from a power-saving mode. However, if you are using a battery-powered laptop, be careful when turning off the sleep or hibernate mode. If the battery dies when you’re in the middle of working on the computer, you can lose data.

You can also change the amount of time before your computer goes into sleep or hibernate mode. Here’s how to do this.

Access Power Options in the Control Panel, and click the Change plan settings link next to the currently selected power plan on the Select a power plan screen, as we described earlier in this article.

On the Change settings for the plan screen, click the Change advanced power settings link.

Double-click on the Sleep heading, and then double-click on Sleep after. If you’re using a laptop, click On battery or Plugged in to activate the edit box. Click the down arrow until Never is selected.

NOTE: If you’re using a desktop computer, click Setting, and click the down arrow until Never is selected.

You can do the same for the Hibernate after heading.

If you want the display to stay on, double-click on the Display heading and then double-click Turn off display after and change the On battery and Plugged in values as desired.

Click OK to save your changes, and close the Control Panel window, as described earlier.

Now you can be smart in your choice of power-saving modes. If you’re using a laptop computer, the best option is most likely Hibernate, because it saves the most power compared to Sleep and Hybrid Sleep.

Monday
Apr022012

CrowdCall - Make Group Calls from Android and iPhone

CrowdCall Is a Simple Way to Make Group Calls from Android and iPhone


By Thorin Klosowski

CrowdCall Is a Simple Way to Make Group Calls from Android and iPhone

iOS/Android: Group calling isn't something most of us need to do often, but it comes in handy when you're trying to make plans with a bunch of people or when you're making the rounds for holiday calls. CrowdCall simplifies the process by making it easy to make calls to up to 20 people directly from your iPhone or Android phone.

The nice thing about CrowdCall is that only one person needs the app to use it so you don't have to worry about getting everyone set up in front of a computer or having their apps in order. To set up a call you tap a plus symbol and start adding people from your contacts list. You can save that list for later so you can quickly bring up sets of people. CrowdCall is supported by ads and with that comes a slightly annoying text message that follows the call, but as an annoyance to an otherwise free app and service it's a reasonable trade-off.

CrowdCall | via The Next Web

CrowdCall Is a Simple Way to Make Group Calls from Android and iPhone

Friday
Mar302012

Disable AutoRun to Stop 50% of Windows Malware Threats

Disable AutoRun to Stop 50% of Windows Malware Threats

According to a biannual Security Intelligence Report from Microsoft, AutoRun—the feature in Windows that automatically executes files when you plug in a USB or connect to a network—accounts for almost half of all malware infections. That's really damn high.

To be clear, these are infections that don't require any user-input from you, so it's kind of not your fault that your computer gets infected. By turning off AutoRun, you'll add an extra step to certain tasks, but it's worth it to cut down on malware 50%.

What's also interesting in this report is that Windows XP SP3 systems get infected about ten times as much as Windows 7 SP1 64-bit systems, and six times as much vs. 32-bit Windows 7 systems. That alone is one reason why you might want to upgrade your parents' machines to Windows 7.

The easiest way to disable AutoRun is to download a free utility like Disable AutoRun or previously mentioned Panda USB Vaccine, run it, and call it a day (these apps are made specifically to turn off AutoRun). On the other hand, if you're comfortable with editing the registry, here's a quick guide to doing it yourself.

Windows XP Has 10-Times The Infection Rate Of Windows 7 | Ghacks

Disable AutoRun to Stop 50% of Windows Malware Threats